

ArtArch Newsroom
AI Video TechniquesDeep Depth of Field AI Video: Keep Every Story Layer Readable
Learn how deep depth of field AI video prompts keep foreground tools, central action, and distant location cues readable in one layered shot.
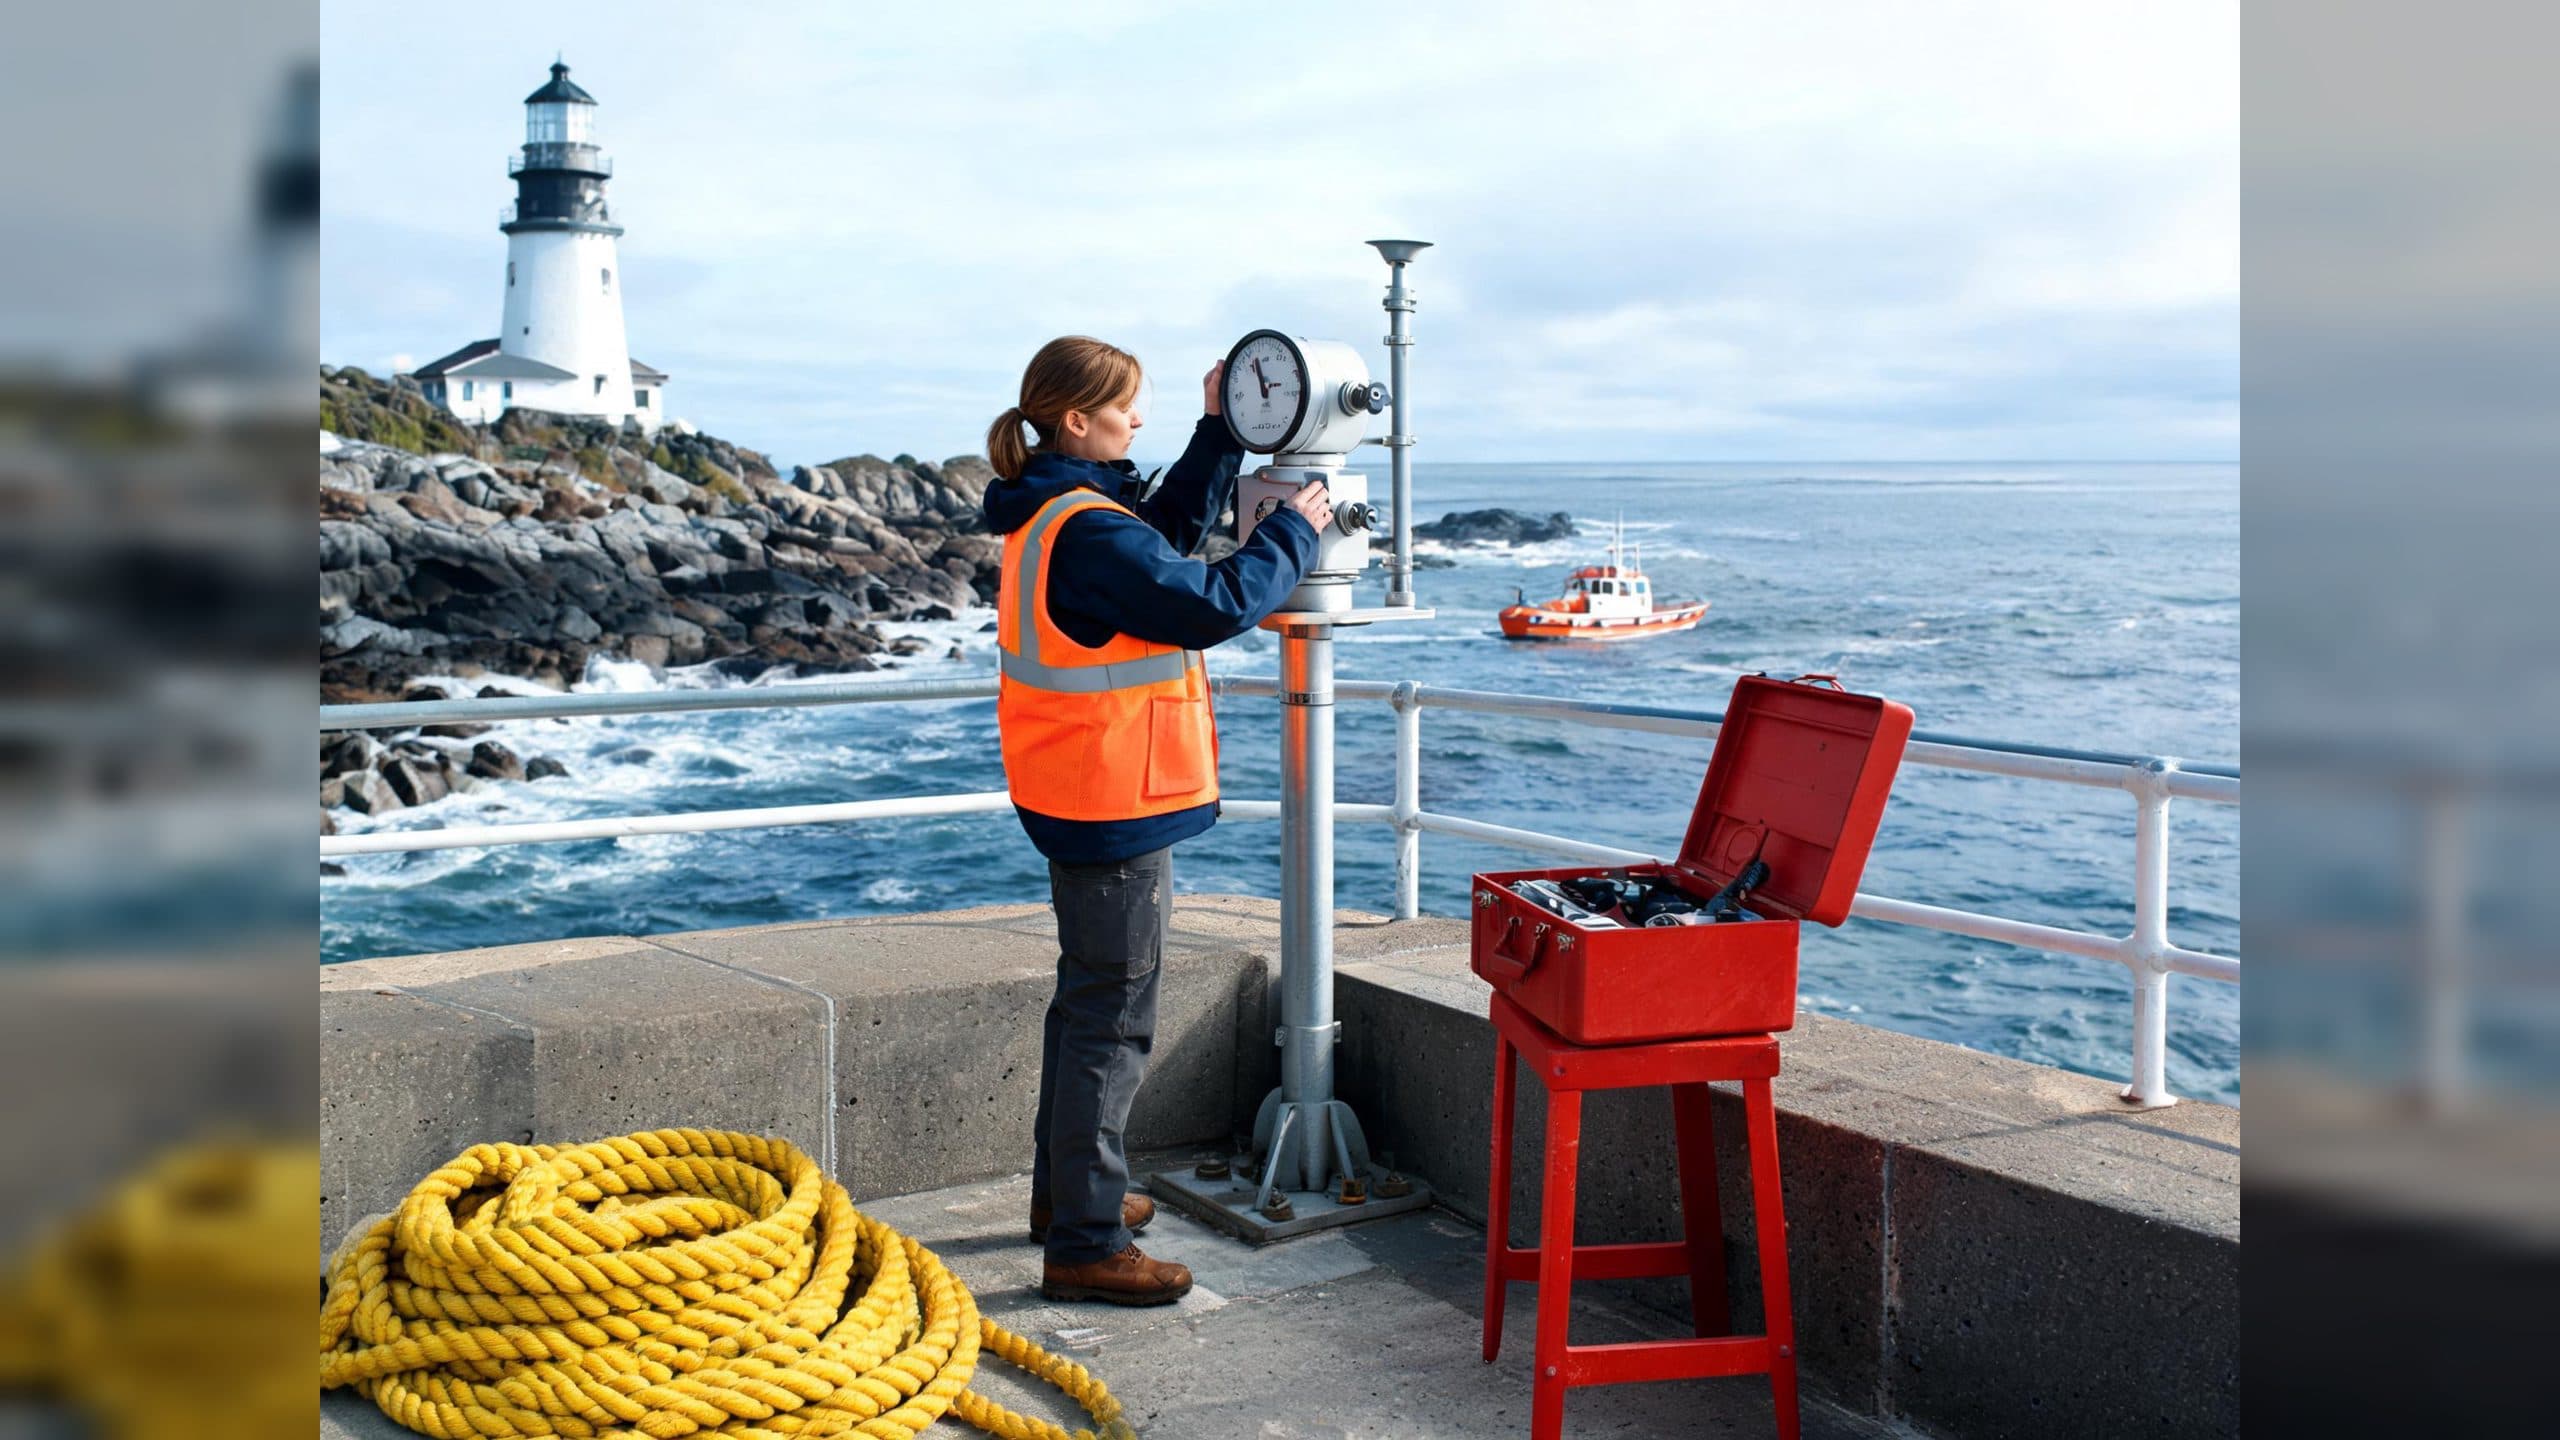
Use a character reference and a layered environment reference to create a deep depth of field AI video where foreground objects, the main action, and distant location cues remain readable together. In a coastal maintenance scene, a yellow rope and red toolbox frame the foreground, a technician operates a weather instrument in the middle, and a lighthouse with a rescue boat defines the distance.
Plan depth as story information
Deep focus is most useful when several distances answer different viewer questions. The foreground can show what tools are available. The middle distance can carry the action. The background can establish place, scale, or an approaching event.
For the lighthouse-platform scene, each layer had one clear job:
- Foreground: a coiled yellow marine rope and an open red toolbox establish hands-on maintenance work.
- Midground: the technician, weather instrument, gauge, and side knob carry the active inspection.
- Background: the white lighthouse, rocky shoreline, ocean, and orange-and-white rescue boat identify the coastal location.
This division turns a broad request for a detailed scene into a reviewable visual plan.
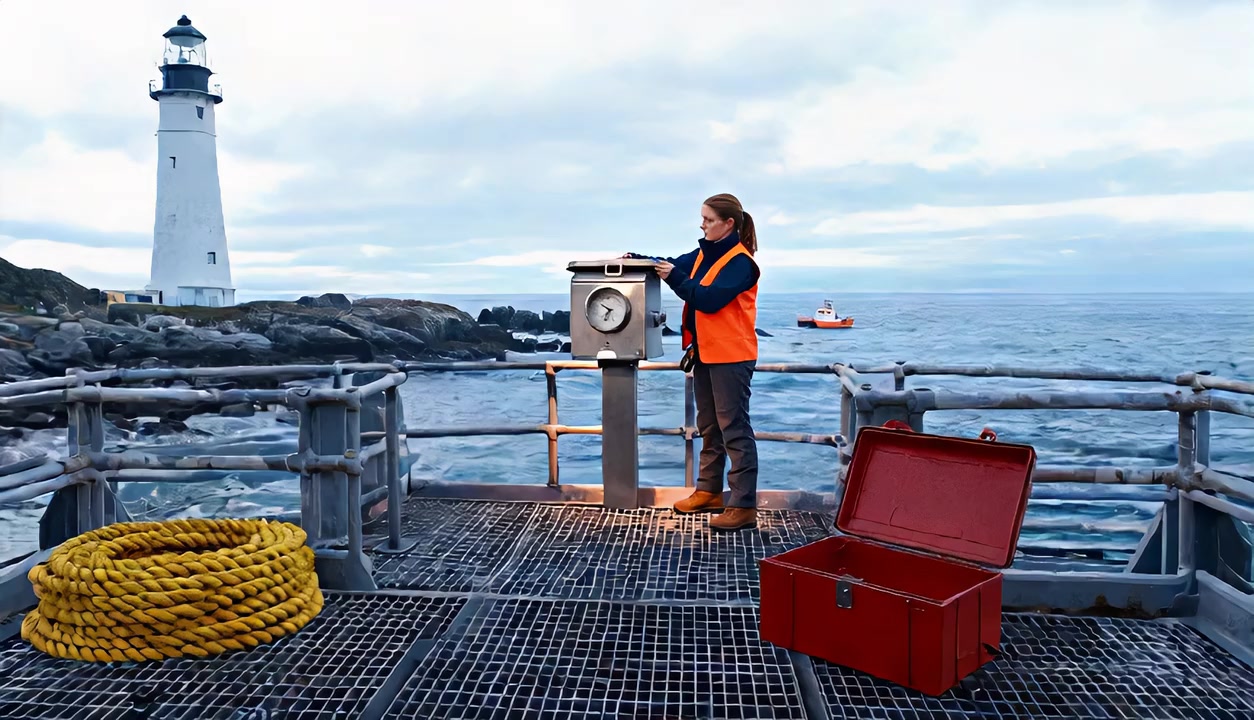
The opening frame places useful information at three distinct distances while keeping the instrument inspection central.
Write one requirement for each distance
A practical deep-depth prompt names the objects that must survive at every plane. Use concrete visual checks instead of a general request for everything to be sharp.
The working instruction for this scene asked for readable rope fibers and toolbox edges in the near foreground, a sharply readable technician, hands, gauge, and fixing knob in the middle, and recognizable shape, color, and position for the lighthouse, rocks, and rescue boat in the distance.
The wording matters because “deep depth of field” describes an overall intention, while the object list defines what the finished shot needs to preserve. It also creates a direct checklist for reviewing the opening, midpoint, and final image.
Keep the main action dominant without blur
When every distance remains visible, composition and movement need to carry the hierarchy. Place the active subject near a strong visual center, give the hands a clear contrast against the work surface, and let foreground objects frame the scene instead of covering the action.
Color can reinforce the same structure. The orange safety vest and red toolbox draw the eye toward the work area, while the white lighthouse and small orange rescue boat remain readable location anchors. The technician's movement at the metal instrument provides the strongest changing signal, so attention stays in the middle even while the wider environment remains visible.
What the six-second scene showed
The deep-depth version used a continuous eye-level wide shot with a restrained forward move. At the start, the rope, toolbox, technician, weather instrument, lighthouse, rocks, and rescue boat all occupied distinct, readable positions. At the midpoint, the technician opened the cover and adjusted the side knob while the near and far layers remained recognizable. At the end, the camera move tightened the frame, yet the lighthouse, shoreline, rescue boat, instrument, and technician still carried a clear spatial relationship.
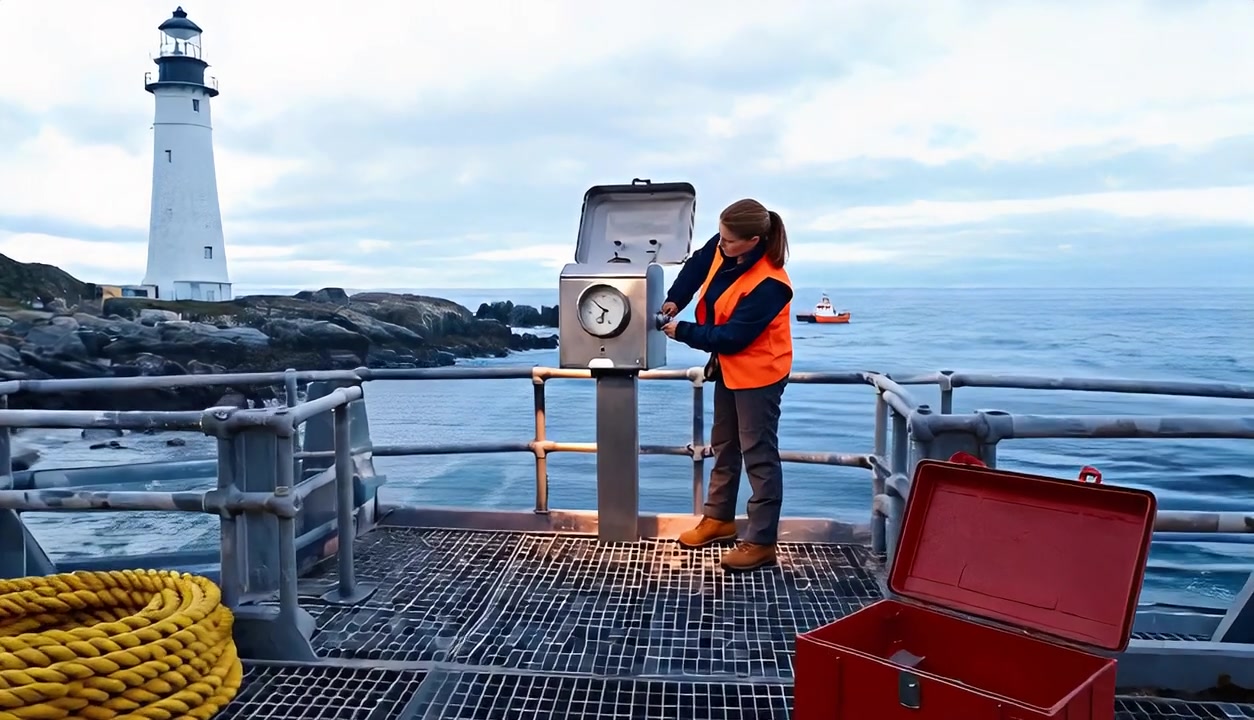
At the midpoint, hand movement remains legible while the lighthouse and rescue boat continue to explain the location.
The comparison also showed why framing belongs in the quality check. Both generations were configured for a wide result, while one output adopted a tighter vertical composition and cropped more of the foreground edges. The wide deep-depth result matched the intended three-layer layout more closely. For production work, verify both layer clarity and the delivered frame shape before attributing the result to focus wording alone.
A repeatable creation flow
- Sketch three horizontal zones. Decide what belongs near the camera, around the subject, and in the distance.
- Give each zone one narrative purpose. Tools, action, and location form a useful starting pattern.
- Name the required objects. List the exact shapes, colors, and positions that should remain recognizable.
- Choose the visual center. Use subject placement, contrast, color, and movement to prioritize the action.
- Review three moments. Compare the first, middle, and final images for clarity, cropping, scale, and spatial continuity.
Where a deep-focus layout helps
A landscape filmmaker can keep nearby plants, a walking subject, and distant mountains readable in one traveling shot. A workshop instructor can show parts on the front bench, a demonstration in the middle, and completed machines along the back wall. An event filmmaker can preserve foreground signage, a speaker on stage, and the audience or venue architecture behind them.
Each use case depends on the same decision: several distances contain information the viewer needs at the same time.
Deep depth of field prompt template
Create a [shot size and camera position] of [main subject] performing [action].
Use deep depth of field across three spatial layers.
Keep the near foreground [objects and visible details] readable.
Keep the midground [subject, hands, and active object] sharply readable.
Keep the far background [location anchors] recognizable in shape, color, and position.
Use composition, contrast, and action priority to keep [main action] dominant.
Preserve the three-layer layout throughout [camera movement].
Replace each bracket with a visible object, action, or camera choice. A short list of essential objects produces a clearer review target than asking for unlimited detail across the frame.
Frequently asked questions
What scenes benefit from deep depth of field?
Use it when foreground, midground, and background all contribute necessary story information, such as tools plus a demonstration plus a recognizable location.
How many objects should I specify in each layer?
Choose the smallest set that explains the scene. One or two anchors per layer usually create a clear hierarchy and an efficient review checklist.
How can the subject stay important when the background is readable?
Place the subject near the visual center, use stronger color or contrast around the action, and give the hands or active object the most noticeable movement.
What should I inspect after generation?
Check the first, midpoint, and final images for the required objects, actual frame shape, cropping, subject priority, and stable spatial relationships.
Keep exploring
More in AI Video Techniques
Motivated Cut AI Video Continuity: Change the Shot for a Reason
Learn how a visible action trigger, clear shot-size change, and locked screen direction create more intentional same-scene AI video edits.

Medium Depth of Field AI Video: Balance Subject and Setting
Learn how medium depth of field AI video prompts keep hands and active objects readable while preserving recognizable environmental context.

AI Video Character Reference Framing: Match Portraits to Landscape Shots
Prepare vertical character portraits for landscape AI video by matching aspect ratio, body scale, headroom, floor space, and movement room before generation.

AI Video Action Continuity Prompt: Match Contact Points Across Segments
Write an AI video action continuity prompt that matches hand contact, prop position, body direction, and movement across connected video segments.