

ArtArch Newsroom
AI Video TechniquesHow to Fix AI Video Continuity Errors with Insert Shots
Fix AI video continuity errors by using a motivated insert shot to bridge position jumps, create off-screen time, and re-establish the new layout.
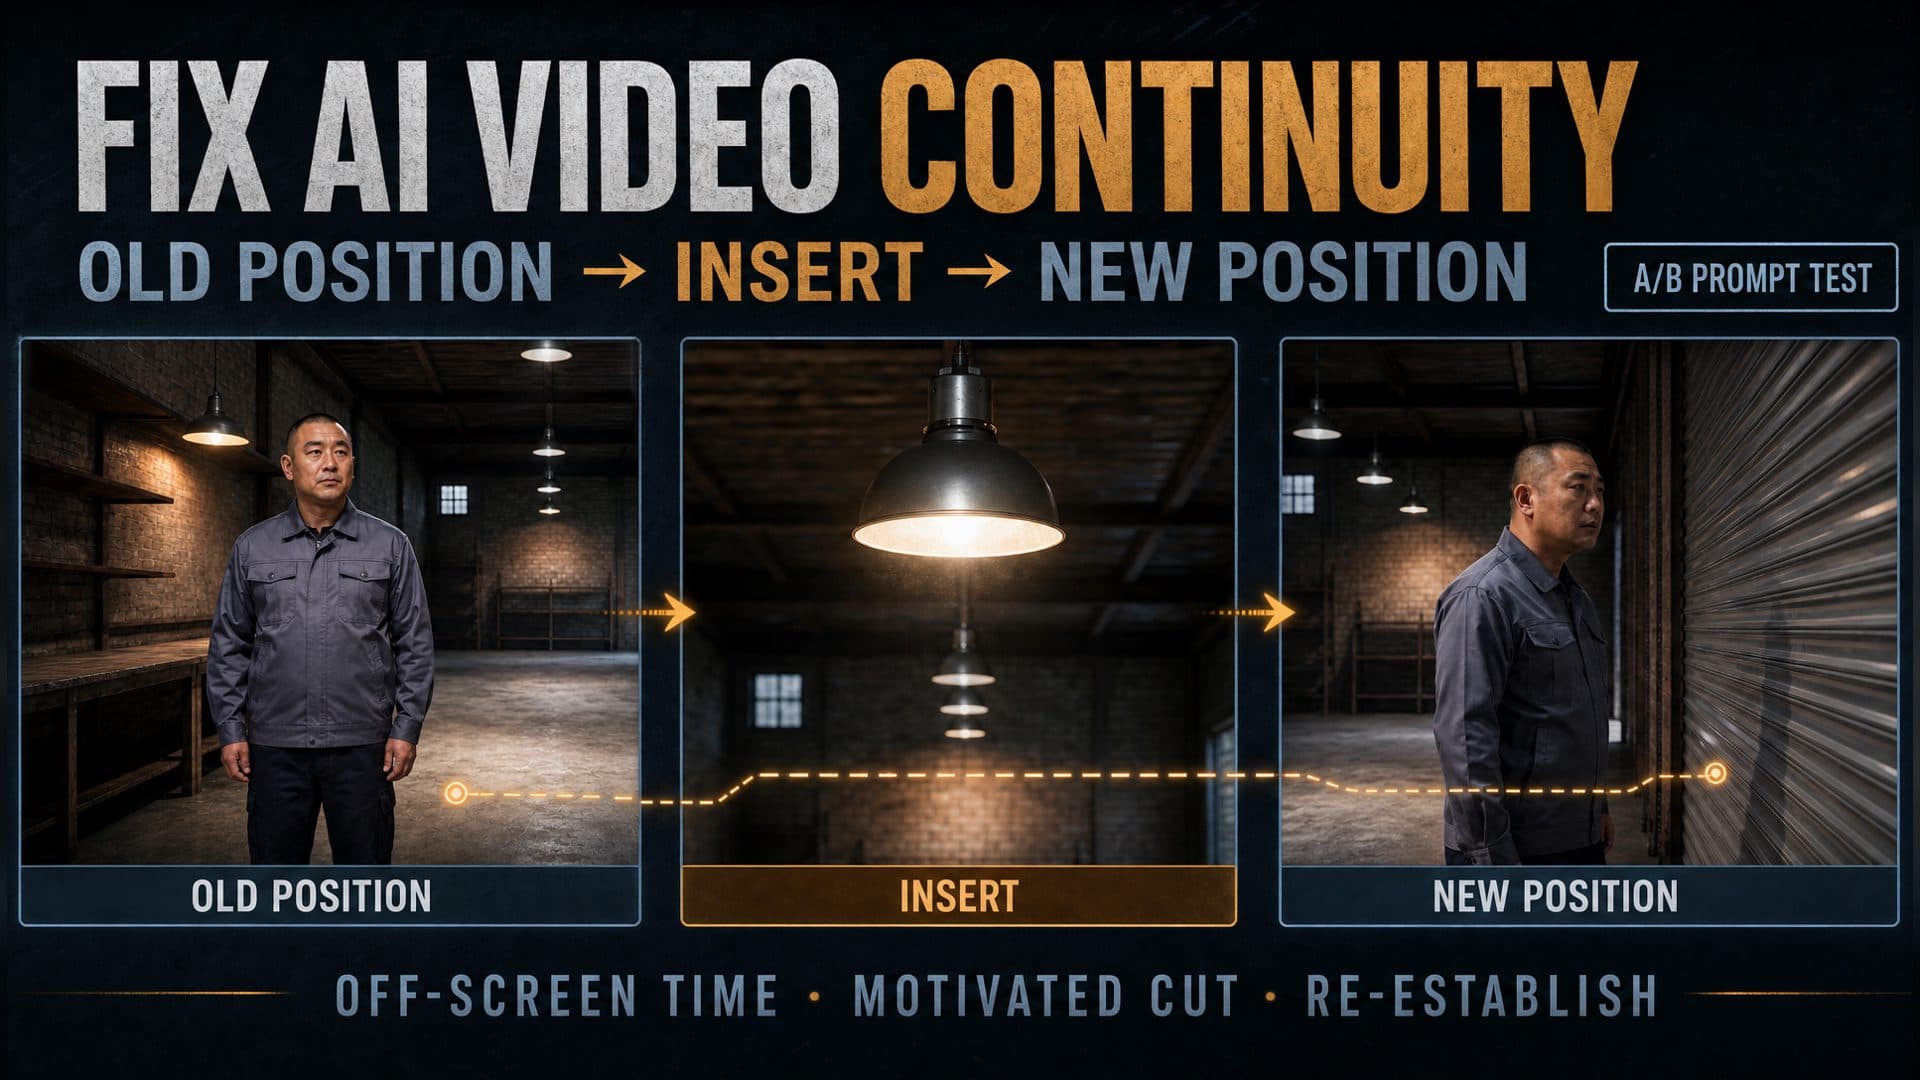
Provide a character reference and an empty location reference to create a short before-and-after continuity test. The first version makes the character jump directly from one side of a warehouse to the other. The second uses a motivated ceiling-lamp insert to create off-screen time, then re-establishes the character beside a shutter door. This structure can help fix AI video continuity errors when the usable shots contain a plausible position change but the direct edit makes that change feel abrupt.
AVT-009 tests the method in an eight-second warehouse scene generated with Seedance 2.0 Fast. Both versions use the same middle-aged warehouse manager, gray-blue work jacket, workbench, central aisle, hanging lamps, and right-side shutter door. The difference lies in the transition between the old position and the new one.
The editorial principle is simple: show the old position, cut to a story-relevant event long enough for movement to happen off screen, then return in a wider view that clearly establishes the new position.
What the A/B continuity test showed
Both outputs are 1280 × 720, 16:9, and approximately 8.08 seconds long. Each file includes a stereo audio track. The comparison evaluates visible position, cut timing, spatial orientation, identity, wardrobe, and the clarity of the new layout.
| Observation | A: direct position jump | B: motivated insert bridge |
|---|---|---|
| Opening position | Manager stands near the left workbench | Manager stands near the left workbench |
| First transition | Hard cut at about 2.25 seconds | Cut to the ceiling lamp at about 1.67 seconds |
| Bridge | Immediate new character position | Environmental insert lasts about 1.87 seconds |
| New position | Manager appears beside the right shutter door | Manager appears beside the right shutter door |
| Spatial explanation | The movement is omitted without a bridge | The insert creates plausible off-screen time |
| Final coverage | Door-side medium and close views | Door-side wider medium views re-establish the relationship |
In the direct-cut sample, the manager begins on the left side of the warehouse near the workbench. At approximately 2.25 seconds, the video cuts directly to him standing beside the shutter door on the far right. The character, jacket, and warehouse remain recognizable, yet the edit presents the relocation as an instantaneous jump. A second cut near 5.21 seconds moves into a tighter profile by the door.
In the insert-shot sample, the same opening position is established first. At approximately 1.67 seconds, the video cuts away to the line of hanging lamps. At approximately 3.54 seconds, it returns to the manager beside the shutter door. The lamp insert lasts about 1.87 seconds, giving the viewer a period in which the walk from left to right could have happened outside the frame.
The generated edit arrives at both transitions earlier than the planned 2.5-second and five-second marks. The visible order still follows the intended repair structure: old position, environmental bridge, new position. This is an E1 observation from one A/B pair with open video seeds, so the result supports a repeatable editing hypothesis for further testing instead of a universal success rate.
Why a direct cut turns movement into an error
Viewers build a quick mental map from set anchors. In this warehouse, the left workbench and right shutter door create two strong positions. Once the manager is shown beside the workbench, the next shot inherits that location unless the edit supplies a reason for time or space to advance.
A direct cut from the left anchor to the right anchor creates a missing step. The viewer sees the same person, same clothing, and same room, but receives no visual interval in which the relocation could occur. The continuity problem becomes especially visible because both anchors appear within one stable warehouse layout.
An insert shot changes the meaning of the missing interval. Attention moves from the character to another story element. Time continues while the character remains outside the frame. When the character returns at a new anchor, the viewer can infer that movement occurred during the cutaway.
This is editorial continuity: the sequence supplies enough cause, time, and spatial information for the new shot to feel intentional.
Build the repair as a three-part sequence
1. Establish the old position and a trigger
Begin with a medium or wide view that makes the starting anchor unmistakable. Show the character near a workbench, doorway, vehicle, desk, window, or another fixed set element.
Then introduce a reason to look away from the character. The trigger can be a sound, environmental movement, secondary action, prop change, or reaction target. In the warehouse test, the prompt uses a metallic sound outside the shutter door and directs the manager’s gaze to the right.
Write the opening as two pieces of information:
Old position: the manager stands beside the left workbench.
Trigger: a metallic impact comes from the right-side shutter door, and he looks right.
The first sentence locks the spatial fact. The second motivates the upcoming cut.
2. Insert a story event and allow off-screen time
Cut to an object or event that belongs to the same scene. The insert should hold attention and move the story forward while the character changes position outside the frame.
The AVT-009 prompt chooses the central hanging lamp. Vibration, movement, and falling dust connect the insert to a disturbance in the warehouse. The generated sample clearly delivers the lamp cut; motion strength and sound synchronization remain useful items for a future frame-by-frame and audio review.
Describe four practical elements:
Insert subject: the central hanging lamp.
Event: the fixture responds to a disturbance in the warehouse.
Purpose: create enough off-screen time for the manager to move from left to right.
Direction: keep the event connected to the shutter-door side of the scene.
The duration should match the implied travel. A one-step adjustment needs a short bridge. Crossing a wide room benefits from a longer insert or a second reaction beat.
3. Re-establish the new position
Return with enough coverage to show where the character is now. A wider medium shot often works better than an immediate close-up because it includes both the character and the new set anchor.
In the repaired sample, the manager appears beside the right shutter door with his body still oriented to the right. The door fills a large part of the frame, while the warehouse remains visible behind him. The new shot confirms the endpoint and preserves the direction of attention.
Write the return shot as a fresh spatial statement:
New position: the same manager now stands beside the right shutter door.
Orientation: his body and gaze remain directed toward the source outside.
Re-establishment: include the door and enough warehouse background to confirm the new layout.
The return shot closes the continuity gap by giving the viewer a new map.
Choose a bridge that belongs to the story
The strongest inserts earn their place twice: they hide the edit and add information.
Environmental change
Use a swinging lamp, rattling window, moving curtain, warning light, drifting dust, or opening door when the location reacts to the same event as the character. This connects the off-screen movement to a visible change in the world.
Prop action
Cut to a hand setting down a tool, a key turning, a phone vibrating, or a document opening. A prop insert works well when the later shot continues the same task from a new position.
Secondary character action
Show another person crossing the frame, reacting, dropping an object, or completing a task. The action gives the main character time to move while keeping the social scene active.
Reaction detail
Use eyes, a hand, breathing, or a small posture change when the position adjustment is short. A reaction bridge can cover a modest shift while preserving emotional continuity.
The insert subject, trigger, and return shot should point toward the same event. That shared cause makes the sequence feel designed instead of patched.
Match the repair to the continuity problem
Insert-shot repair works best when both original shots remain individually usable and the missing information is time or movement.
| Continuity symptom | Productive response |
|---|---|
| Character moves a few steps between cuts | Add a motivated bridge and re-establish the new anchor |
| Background character changes position | Give the background action a reason and enough off-screen time |
| Hand moves from one nearby task to another | Use a prop or reaction insert between states |
| Main character crosses the room | Hold the bridge longer and return in wider coverage |
| Face, costume, or body identity changes | Prioritize identity-consistent regeneration or reference control |
| Screen direction reverses across an established axis | Rebuild the transition with axis-aware coverage |
| A key prop disappears or changes owner | Show a visible handoff, placement, or pickup action |
This classification keeps editing solutions focused. Position and timing gaps benefit from an off-screen bridge. Identity, wardrobe, axis, and ownership problems call for their own continuity controls.
A prompt template for continuity repair
Create an eight-second continuity-repair sequence using the same character and location references throughout.

0–2.5 seconds — old position:
Show [character] at [old set anchor] in a medium or wide shot.
Introduce [sound, environmental event, prop action, or secondary action] from [direction].
The character notices the trigger and directs attention toward it.

2.5–5 seconds — motivated insert:
Cut away to [environmental object, prop, secondary character, or reaction detail].
Show [one story-relevant change or action].
Hold the insert long enough for the main character to move from [old anchor] to [new anchor] outside the frame.
Keep the insert connected to the same trigger and direction.

5–8 seconds — new position:
Return in a wider medium shot.
Show the same character at [new set anchor].
Preserve identity, hairstyle, wardrobe, body direction, and the fixed layout of the location.
Include both the character and [new anchor] clearly enough to establish the updated spatial relationship.
Continue [the action or investigation] motivated by the trigger.
Treat the timestamps as a planning grid. After generation, measure the actual cuts and judge whether the insert creates enough perceived time for the distance traveled.
Review the result in five checks
Check the old anchor
Choose a frame before the first cut. Confirm that the starting position is clear and tied to a fixed object in the set.
Measure the bridge
Record the first and second cut times. The difference is the visible off-screen interval. Compare that duration with the distance implied by the new position.
Check the return coverage
Choose a frame immediately after the second cut. Confirm that the character and new anchor appear together. Wider coverage usually communicates the reset more efficiently.
Compare identity and wardrobe
Check face shape, hair, jacket, trousers, body proportions, and major accessories across the opening and return frames. A clean positional bridge gains value when the character remains recognizable.
Watch direction and action
Confirm that the gaze, body orientation, event source, and next action form one direction of attention. The return shot should answer the trigger introduced before the insert.
For repeat testing, run several seeds with the same references and distance. Compare insert duration, identity stability, set-anchor placement, and the clarity of the return shot.
Where this technique is useful
Narrative short films
An actor appears near a desk in one usable shot and beside a window in the next. A curtain movement, phone vibration, or reaction insert creates an event-driven interval, then the window shot resumes the investigation.
Product and workplace videos
A technician shifts from a control panel to an equipment cabinet between generated shots. An insert of a warning indicator changing state makes the relocation part of the task instead of a visible jump.
Dialogue scenes
A speaker changes chair position or moves closer to the table. A cut to the listener’s hands, a document, or a reaction gives the blocking change room to happen while preserving the conversational beat.
Action and suspense edits
A character relocates behind cover, reaches a doorway, or approaches a sound source. Environmental impact, debris, a moving shadow, or a secondary action can bridge the change and intensify the event at the same time.
Frequently asked questions
What kind of AI video continuity error can an insert shot repair?
Use it for plausible position changes, short blocking gaps, background movement, and task transitions where both surrounding shots remain visually usable. The insert supplies time and motivation between the two states.
How long should the insert shot last?
Match the duration to the implied movement. A small shift may read within one short beat. Crossing a room benefits from a longer environmental action or a second reaction beat before the new position appears.
What should appear in the return shot?
Show the same character, the new set anchor, and enough of the surrounding location to rebuild the spatial map. Preserve body direction and continue the event that motivated the cutaway.
How do I choose between an insert-shot repair and regeneration?
Use the insert structure when time or movement is the missing link. Choose identity reference control, wardrobe continuity, prop-state planning, or axis-aware regeneration when the mismatch affects those specific visual facts.
Click the template card to enter the experience page and try this insert-shot method with your own character, location, old position, motivated bridge, and new position.
Keep exploring
More in AI Video Techniques
How to Make an AI Motion Transfer Video from a Dance Reference
Learn how beginners can use a character image, dance reference, and tracked depth motion to make an AI motion transfer video with ArtArch.
Depth-Based Action Reenactment for Beginners
Learn how depth-based action reenactment turns a dance reference into a motion guide for a new character with ArtArch.
AI Dance Video Reenactment from a Reference Video for Beginners
Learn how to use a character image, dance reference video, and depth motion guide to create an AI dance reenactment with ArtArch.
Build an AI Video Workflow with an Agent and ArtArch CLI
Build an AI agent video workflow with ArtArch CLI: inspect a canvas, connect references, run a flow, wait on the same run, and download artifacts.