

ArtArch Newsroom
AI Video TechniquesAI Video 180 Degree Rule Prompts: A Shot-Reverse-Shot A/B Test
Learn AI video 180 degree rule prompts for stable shot-reverse-shot scenes with clear screen direction, eyelines, shoulder framing, and timing.
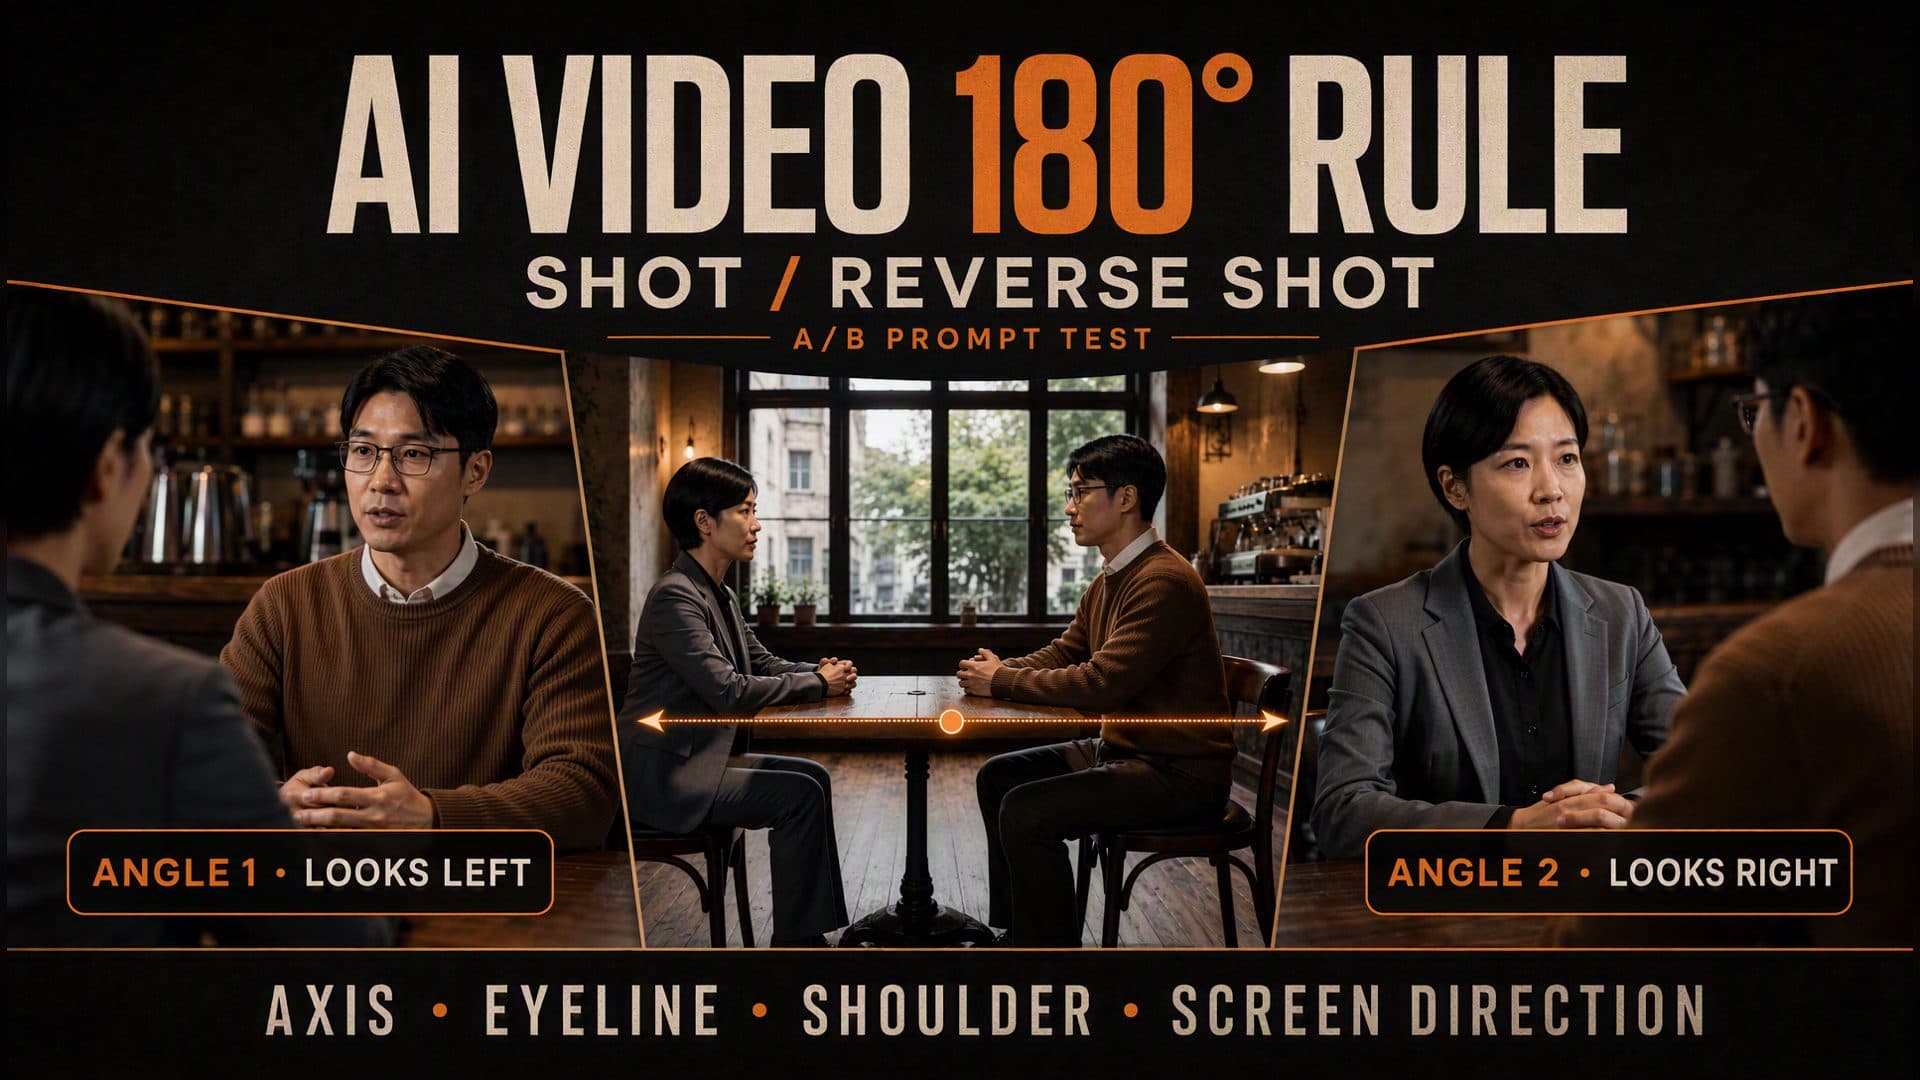
Provide a two-character reference and an empty location reference to create an eight-second dialogue scene that begins with a two-shot, moves behind one character’s shoulder, and finishes behind the other character’s shoulder. These AI video 180 degree rule prompts keep the woman on screen left looking right, the man on screen right looking left, and both close-ups connected to the same café table.
AVT-006 compares a general shot-reverse-shot instruction with a structured version that specifies the line of action, camera working side, screen direction, foreground shoulder, and timing for each shot. Both samples produced spatially coherent coverage in this run. The structured version added a production plan that could be checked shot by shot.
The practical lesson is precise: start with a shared spatial map, give every camera position the same side of the action line, and repeat each character’s screen side and eyeline when the framing changes.
What the A/B test showed
Both samples use the same short-haired female investigator in a gray suit, the same male accountant in glasses and a brown sweater, and the same quiet café. The characters sit across a small wooden table. A large window fills the back wall, while a bar counter anchors the right side of the room.
Each video is 1280 × 720, 16:9, and about 8.06 seconds long. Both files contain an audio track. The visual comparison focuses on camera direction, character placement, eyelines, foreground shoulders, and shot order.
| Observation | General prompt | Structured 180-degree prompt |
|---|---|---|
| Opening | Two-shot with woman left and man right | Two-shot with woman left and man right |
| First close coverage | Woman’s shoulder on left foreground, man on right | Same spatial relationship |
| Reverse coverage | Man’s shoulder on right foreground, woman on left | Same spatial relationship |
| Eyelines | Man looks left, woman looks right | Man looks left, woman looks right |
| Timing | Model chooses the transition rhythm | Prompt assigns 0–2, 2–5, and 5–8 seconds |
| Review criteria | General “natural spatial relationship” | Explicit side, gaze, shoulder, and continuity checks |
The result matters because the control sample also succeeded. A short instruction such as “begin with a two-shot, then cut to each character in over-the-shoulder close-up” can already activate familiar film language in Seedance 2.0 Fast.
The structured prompt serves a different purpose. It converts the desired outcome into named, visible conditions. A creator can inspect the opening, first close-up, reverse close-up, and cut timing against the plan.
This is an E1 observation from one café setup and one generation per prompt. It offers a useful workflow for repeated testing across random states, locations, blocking patterns, and dialogue styles.
Read the three shots as one spatial system
Shot 1: establish screen left and screen right
The opening frame places the investigator on the left and the accountant on the right. They face each other across the table. The woman looks right; the man looks left.
The window, table, chairs, and bar counter form a spatial map around them. Once the viewer accepts that map, every close-up needs to preserve its logic.
In the structured sample, the opening is assigned to the first two seconds:
0–2 seconds:
Use a medium two-shot to establish the room.
Character A stays on screen left and looks right.
Character B stays on screen right and looks left.
The table remains between them.
This setup establishes more than composition. It defines the relationship that every later camera angle inherits.
Shot 2: photograph the man from the woman’s shoulder
The next shot places the woman’s head and shoulder in the left foreground. The man becomes the principal subject on the right and directs his eyeline toward the left foreground.
The foreground shoulder has a spatial job. It reminds the viewer whose side of the table the camera occupies, confirms that the other character remains present, and gives the subject a specific place to look.
The structured instruction reads:
2–5 seconds:
Photograph Character B from behind Character A’s left shoulder.
Character A occupies a small area of the left foreground.
Character B stays on the right as the main subject and looks left.
Keep the foreground shoulder clear of Character B’s face.
The generated frame follows this relationship. The investigator’s shoulder stays soft and secondary, while the accountant’s eyes, glasses, mouth, and upper-body performance remain visible.
Shot 3: reverse to the woman from the man’s shoulder
The reverse angle moves the man’s head and shoulder to the right foreground. The investigator becomes the principal subject on the left and looks right.
The pair now forms a complementary pattern:
Character A: screen left → looks right
Character B: screen right → looks left
The foreground shoulder changes sides, while the underlying relationship stays stable. Two separately framed close-ups still feel like opposite views of one table.
The structured timing assigns this reverse angle to the final three seconds:
5–8 seconds:
Photograph Character A from behind Character B’s right shoulder.
Character B occupies a small area of the right foreground.
Character A stays on the left as the main subject and looks right.
Preserve complementary screen direction.
How the 180-degree rule works
Imagine a line running between two people who face each other. This is the line of action. Choose one side of that line as the camera working area.
As the camera moves within that half-circle:
- Character A continues to occupy the left side of the relationship.
- Character B continues to occupy the right side.
- A looks right and B looks left.
- The foreground shoulders switch sides in a predictable pattern.
- Furniture and architectural anchors retain a readable orientation.
In the AVT-006 café, the bar counter acts as a practical reference for the selected working side. A location-based instruction such as “keep every camera position on the bar-counter side of the line” is easier to inspect than an abstract request for spatial continuity.
This method creates a stable base for expressive choices. Shot size, performance, pacing, and emotional intensity can change while the viewer retains a clear understanding of where the characters sit.
When a story needs an intentional axis change, establish the original space first, then show the camera crossing through a moving shot, a neutral angle on the line, or another visible transition. The direction change then reads as a deliberate story beat.
Why AI dialogue coverage loses direction
Film terminology stays too broad
“Create shot-reverse-shot coverage” describes a familiar editing pattern, yet it leaves character side, gaze, camera side, and shoulder placement open. The model may interpret the phrase well, as the control sample did, while the creator still has few criteria for reviewing the result.
Each portrait gets a separate coordinate system
One character may look right in a strong close-up, and the second character may also look right in another attractive close-up. The individual frames work as portraits, while the edited pair loses the feeling of mutual eye contact.
A shared action line solves this by assigning both portraits to one spatial system before the close-ups are described.
The foreground shoulder lacks a defined role
An over-the-shoulder shot requires more than naming the subject. The prompt should state which shoulder appears, which side of frame it occupies, how much space it uses, and which parts of the subject remain clear.
The establishing shot and close-ups use different maps
The two-shot may show A left and B right, while a later close-up places A on the opposite side with the same gaze direction. Repeating the established side and eyeline in every shot keeps the map continuous.
Too many simultaneous demands dilute camera logic
Complex dialogue, walking, prop exchanges, orbiting camera movement, and several cuts can compete inside a short duration. A seated two-character scene offers a clean first test for the axis. Movement and additional coverage can follow once the base relationship is stable.
A five-part prompt method
1. Define the relationship
State who faces whom and identify the physical line between them.
Character A and Character B sit across a small table.
Their eye contact creates a clear line of action.
2. Choose a visible camera working side
Tie the side to a fixed environmental anchor.
Keep every camera position on the bar-counter side of the line.
The bar counter, doorway, window, or wall can turn a geometric rule into a location-specific direction.
3. Lock the opening screen direction
Character A stays on screen left and looks right.
Character B stays on screen right and looks left.
Use the two-shot to establish this relationship before the close coverage begins.
4. Describe both shoulders separately
For the man’s close-up:
Use Character A’s left shoulder in the left foreground.
Keep Character B on the right, looking left.
For the woman’s close-up:
Use Character B’s right shoulder in the right foreground.
Keep Character A on the left, looking right.
Add a visibility condition so the shoulder supports the composition while preserving the subject’s face.
5. Assign time and continuity checks
Give each shot a time range, then restate the invariants:
Keep identities, clothing, seats, table position,
screen direction, and café layout continuous.
Preserve the same camera working side across every cut.
An eight-second shot-reverse-shot prompt template
Create an eight-second two-character shot-reverse-shot scene.

Character [A] and Character [B] face each other at [location].
Their positions create a clear line of action.
Keep every camera position on the side of the line nearest [fixed location anchor].

0–2 seconds — establish:
Use a [medium/wide] two-shot.
[A] stays on screen left and looks right.
[B] stays on screen right and looks left.
Keep [table, door, window, counter] stable.

2–5 seconds — first over-the-shoulder shot:
Photograph [B] from behind [A’s] left shoulder.
[A] occupies a small area of the left foreground.
[B] stays on the right as the main subject and looks left.
Keep the foreground shoulder clear of [B’s] face and main gesture.

5–8 seconds — reverse over-the-shoulder shot:
Photograph [A] from behind [B’s] right shoulder.
[B] occupies a small area of the right foreground.
[A] stays on the left as the main subject and looks right.
Preserve complementary screen direction.

Keep character identity, wardrobe, seating, furniture,
and environmental orientation continuous through every cut.
The timestamps can expand for longer scenes. The core sequence remains the same: establish, isolate one character, reverse to the other, and preserve the shared map.
Three scenes that benefit from this method
An interrogation or negotiation
A filmmaker has an investigator and a witness seated across a desk. The opening two-shot shows distance and power. An over-the-shoulder close-up isolates the witness during a difficult answer, then the reverse angle captures the investigator’s response. Stable eyelines keep the tension focused on performance.
A confession or farewell
Two characters sit by a window or face each other on a station platform. The scene depends on glances, pauses, and subtle changes in expression. Complementary direction makes each close-up feel connected to the other person.
An interview or educational video
A host and guest share a table in a studio or café. The creator needs a two-shot for context, one angle for the question, and a reverse angle for the answer. A fixed action line makes the coverage easy to edit into a coherent conversation.
The same approach also fits AI comics and serialized shorts where character close-ups are generated separately. Recording the axis, screen side, and gaze direction gives every new shot a compact continuity brief.
How to review the generated scene
Review three representative frames first:
- In the establishing shot, confirm A left, B right, and complementary eyelines.
- In the first close-up, confirm A’s shoulder on the left foreground and B on the right looking left.
- In the reverse close-up, confirm B’s shoulder on the right foreground and A on the left looking right.
Then watch the full clip and evaluate the cuts:
- Does the order follow establish → B close-up → A close-up?
- Do the shoulders switch sides cleanly?
- Do both characters keep their identity, wardrobe, and seats?
- Do the table, window, and bar counter retain a consistent orientation?
- Does the subject’s face remain clear in both close-ups?
- Does each gaze point toward the foreground partner?
For the next test, repeat the same A/B prompts across several random states. Then use a standing conversation, a walking exchange, and a second location. These variations reveal how well the spatial plan survives more demanding blocking.
Frequently asked questions
What should I define first in an AI shot-reverse-shot prompt?
Define the two character positions and the line of action between them. Then choose one camera working side and assign complementary screen directions: A left looking right, B right looking left.
How large should the foreground shoulder be?
Use a small, soft foreground shape that confirms the partner’s position while keeping the subject’s eyes, mouth, and key gesture clear. State the shoulder side and its role in each angle.
Why did the general prompt also work in this test?
Seedance 2.0 Fast interpreted the familiar sequence of a two-shot followed by two over-the-shoulder close-ups. The structured version adds timing and review criteria that make the intended camera plan easier to reproduce and diagnose.
How can I use the rule with three or more characters?
Choose the pair that owns the current story beat and establish a local line of action for that pair. When attention shifts to another pair, use a wider or neutral shot to establish the new spatial relationship.
Click the template card on this page, enter the experience page, and try the AVT-006 shot-reverse-shot workflow.
Keep exploring
More in AI Video Techniques
How to Make an AI Motion Transfer Video from a Dance Reference
Learn how beginners can use a character image, dance reference, and tracked depth motion to make an AI motion transfer video with ArtArch.
Depth-Based Action Reenactment for Beginners
Learn how depth-based action reenactment turns a dance reference into a motion guide for a new character with ArtArch.
AI Dance Video Reenactment from a Reference Video for Beginners
Learn how to use a character image, dance reference video, and depth motion guide to create an AI dance reenactment with ArtArch.
Build an AI Video Workflow with an Agent and ArtArch CLI
Build an AI agent video workflow with ArtArch CLI: inspect a canvas, connect references, run a flow, wait on the same run, and download artifacts.